 I just love a great art project, don’t you? And this one is so much fun for kids of all ages! It can be adapted to be very simplistic for young children, but it can also be adapted for older, more artistically experienced students, too! Even adults have fun with this one. You only need a few supplies, and it turns out beautifully.
Before we begin, I want to share with you a little bit about how kids learn. There are many, many approaches and methods, but the one I’ll mention today is the “spiral method.” It’s all about seeing information over and over again, a little more in depth each time. Art lends itself well to this method, since each time a child is introduced to a concept, the brain stores a bit of information about it. The next time that concept is seen, a bit more is stored and retained. When the information is then used and applied to do something, such as make an art project, the brain then recognizes it as important and retains even more! So, by using art to bolster the retention of concepts, the whole process of learning becomes not only more enjoyable to the student, but more valuable and natural. I’m all about the joy of learning, and this is where it’s at.
OK, now that I’ve shared with you just a few of the “why’s” of learning through art, it’s time for the “how to” for this versatile project. To make the “Changing Seasons Tree” project, here’s what you’ll need:
SUPPLY LISTS
*Younger kids*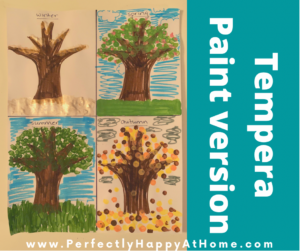
- 1 piece of white card stock paper
- a ruler
- black marker or sharpie (for adult to use)
- brown marker (washable ok)
- 10-15 cotton swabs
- tempera paint (white, green, pink, brown, yellow, orange)
*Older Kids/Adults*
- 1 piece of white card stock paper
- a ruler
- black sharpie
- watercolor paints in all colors
- various sizes of artist’s paint brushes
OK, now that you have the scoop on what you’ll need, here’s what to do to make this easy Changing Seasons Tree project come to life!
INSTRUCTIONS
- Use the ruler to divide the white card stock paper into 4 rectangles, drawing a “plus sign” through the middle of the paper with the black sharpie.
- Label each quadrant at the top of the the boxes with the names of the four seasons, leaving plenty of room for the art in each space. I like to go in this order {winter=top left, spring=top right, summer=bottom left, fall/autumn=bottom right}.
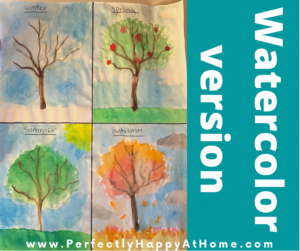
- Draw with brown marker (younger children), or paint with brown water color paint (older kids/adults), the same tree trunk with branches in each quadrant. Try to make them look almost exactly the same, since this is meant to look like the same tree in each season of the year.
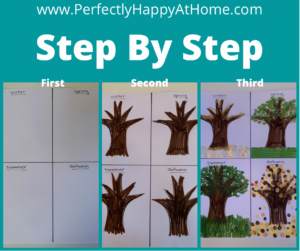
- WINTER: paint snow onto the branches and the ground (younger children use white tempera paint and the cotton swabs)(older kids/adults use water colors). Add a wintery sky in the background.
- SPRING: paint bright green leaves and bright pink flowers onto the branches, and green grass on the ground (younger children use tempera paint and cotton swabs)(older kids/adults use watercolors). Paint the sky blue with a few fluffy white clouds.
- SUMMER: paint deep green leaves on the branches, and long green grass on the ground (younger children use tempera paint and cotton swabs)(older kids/adults use watercolors). Paint a bright sun in the blue sky.
- FALL/AUTUMN: paint brown, orange, and yellow leaves on the branches and falling down onto the ground (younger children use tempera paints and cotton swabs)(older kids/adults use water colors). Paint some grey clouds in the sky.
- Allow to dry, and you’re done!
This is actually an art project I like to do alongside my kids and students. It doesn’t matter if you are a talented artist, like our daughter is, or just like to make marks on paper, like I do. The kids will get a kick out of mama joining them in their art project, and mama will have some fun creating something unique, too!
HOMESCHOOL MOM TIPS:
1. To minimize the mess made by paints, flatten out paper grocery bags before the project gets underway, and line the whole art surface with them. If they get too covered, you can just throw them out when you’re done. Easy cleanup! Another plus is that your table or floor won’t get painted, either!
2. If you would like to use this template for yourself and your children feel free to print this out. It already has the season labels, page dividers, and tree drawn in for you!
May this art project bless your heart, help you teach your children, and bring you joy today. I’ll be back with more art fun soon!
Changing Seasons Art

Ingredients
- Younger kids
- 1 piece of white card stock paper
- a ruler
- black marker or sharpie (for adult to use)
- brown marker (washable ok)
- 10-15 cotton swabs
- tempera paint (white, green, pink, brown, yellow, orange)
- Older Kids/Adults
- 1 piece of white card stock paper
- a ruler
- black sharpie
- watercolor paints in all colors
- various sizes of artist's paint brushes
Instructions
- Use the ruler to divide the white card stock paper into 4 rectangles, drawing a "plus sign" through the middle of the paper with the black sharpie.
- Label each quadrant at the top of the the boxes with the names of the four seasons, leaving plenty of room for the art in each space. I like to go in this order {winter=top left, spring=top right, summer=bottom left, fall/autumn=bottom right}.
- Draw with brown marker (younger children), or paint with brown water color paint (older kids/adults), the same tree trunk with branches in each quadrant. Try to make them look almost exactly the same, since this is meant to look like the same tree in each season of the year.
- WINTER: paint snow onto the branches and the ground (younger children use white tempera paint and the cotton swabs)(older kids/adults use water colors). Add a wintery sky in the background.
- SPRING: paint bright green leaves and bright pink flowers onto the branches, and green grass on the ground (younger children use tempera paint and cotton swabs)(older kids/adults use watercolors). Paint the sky blue with a few fluffy white clouds.
- SUMMER: paint deep green leaves on the branches, and long green grass on the ground (younger children use tempera paint and cotton swabs)(older kids/adults use watercolors). Paint a bright sun in the blue sky.
- FALL/AUTUMN: paint brown, orange, and yellow leaves on the branches and falling down onto the ground (younger children use tempera paints and cotton swabs)(older kids/adults use water colors). Paint some grey clouds in the sky.
- Allow to dry, and you're done!