
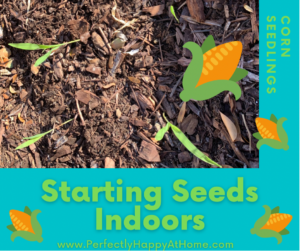
 When it’s winter, and outside our windows looks cold and dreary, I just itch to have a little bit of green in my life! (Ok, if the truth be told, I really want green plants, a nice warm cup of coffee, AND a fire in the fireplace.) I think plants are the signs of new life, of springtime coming, of possibilities and hope. The tiny sprouts that usher forth this hope call to me. They stir my heart in the coldest part of winter, and help me look forward to the sunshine.
Have you ever sprouted seeds from a seed packet? If you haven’t, please try it! The exhilaration when the hard, dry seed you stuck into the soil peeks through with a tiny, green “hello”…well, it’s awesome. You definitely don’t want to miss it. And the kids will love it, too. I stated planting vegetable seeds when I was a little girl. I watched my grandpa do it, and decided I would do it, too. I remember the first time I asked my mom if I could have a small piece of the yard to plant a little vegetable garden…she was so happy that she took me to the store right away to buy seed packets. I chose the ones I had seen my grandpa planting, of course. I worked and worked until the ground was soft, and shaped into little neat rows. I planted my seeds, watered, and waited. One day, I woke up early before school and was ecstatic to discover my first seedlings had appeared! And that, my friends, is what hooked me. I was a seed-planter for life.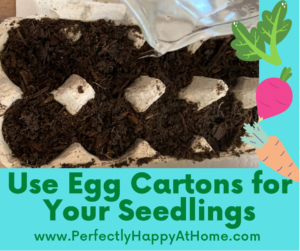
To sprout seeds indoors, before the ground and temperatures outside are ready, is so very simple. You don’t need any special equipment, either. I start the process by collecting cardboard egg cartons. Why, you ask?? Well, because they are the perfect place to plant seeds to get them started in their growth. (If you would rather use pre-made sprouting pots, thats ok too!)
Here’s how I prepare the egg cartons:
- Cut off the top of the egg carton, leaving only the “cup” part.
- Fill each cup with dirt. TIP: I always set the egg carton on a stack of paper towels, because they do leak. Also, I place these little “sprout incubators” on a table that has a plastic liner on top, so as not to ruin the wood.
- Prepare the soil by watering it until it is moist, but not flooded. (It should be just wet enough to moisten both the soil and the egg carton.) I usually let this sit until the following day.
- Plant the seeds. I recommend one large seed or two smaller seeds maximum per egg carton cup.
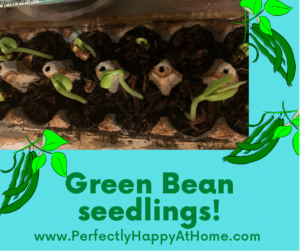
- Place near a sunny window. Keep the egg cartons on the paper towels. You can change out the paper towels daily if you are worried about moisture build-up.
- Water daily, but again, only enough to keep the soil damp, not flooded or overflowing.
- WAIT PATIENTLY. Haha, this one is the hardest! But don’t worry! It won’t be long at all until you see those cute little green sprouts peeking through the soil.
 A really fun part of this project to do with the kids is to chart daily any changes that are happening. Have them check the egg cartons everyday and really practice their observation skills. You can even have them write down their daily findings and make a chart or a graph (or both!). Once the sprouts begin to peek out, this is a great opportunity for nature journaling and sketching, when things outside might not be so interesting right now.
If you already have seeds that are good for planting this season, great! You’re ahead of the game and ready to go! If you don’t have any seeds yet, you have a few options. You can bundle up, head to your nearest hardware store, and have your pick of the whole display rack. You can also order a great seed pack online. There may be seed share opportunities local to you as well.
As we look forward to spring’s arrival, I hope you’ll try your hand at indoor seed starts. By the time they’re big enough to be transplanted, the weather outside should be ready, too. It has been recommended to me to start your egg carton seedlings about 2 weeks before your yard normally sees its last frost, that way you can estimate the best start timing and transplant timing. And this project is very forgiving if you estimate wrong.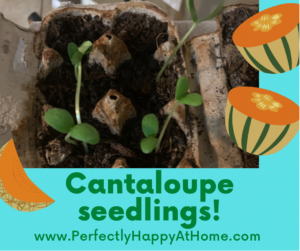
- Seeds didn’t sprout? Try again! There’s still time!
- Seeds sprouted too soon and the weather outside is still too cold? Transplant to a larger pot and keep them indoors until the weather cooperates.
- Seeds molded, due to excess water? Start again! You can add a thicker layer of paper towels underneath to wick more moisture or water only every other day if you live in an area with high humidity.
- Seeds sprouted, then died? Try again, but in a different location. Seedlings can be sensitive!
The important thing is…don’t be afraid to try. Don’t be afraid to start. Bring in that green life and invite the springtime inside with your seedling starts. Grab your coffee, start planning a list of seeds you’d like to try, and get the kids excited. I’m so excited for you to see this “garden of joy” growing! Need some seed ideas? Check out my post called The 10 Easiest Fruits and Vegetables to Grow in Your Backyard. Celebrate life, hope, and joy today, mamas…it’s like a soothing hug wrapped tightly around you. And don’t forget…share the pictures of your seedlings in the comments below! I would love to see them!
One thought on “Too Cold for Seedlings? No Problem!”